How To Remove Chair Rail - How To Remove a Chair Rail - Just Call Me Homegirl : Removing the chair rails from the walls demo is the fun part.. If you didn't use the putty knife and just started to pry it off you would leave more dents or even holes in the wall from the screwdriver. Consider complete panelling below the chair rail: If you don't like that look, i would recommend removing the chair rail. To release the lock simply pull the lever so that it is facing the unlocked position. Take a piece of sandpaper and use it to sand down the chair rail.
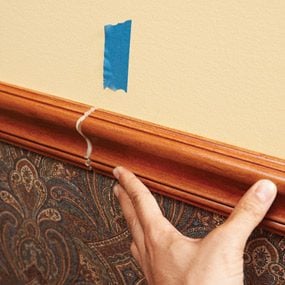
To release the lock simply pull the lever so that it is facing the unlocked position. There is work involved and work involved to get things ready to paint once the chair rail is removed, but overall the actual removal is not that hard. Slide the wide putty knife flat against the wall, starting at one end of the chair rail. Wainscoting or bead board would be a beautiful look. Slide the thin edge of the pry bar into the gap, using the putty knife as a shield to protect the wall.
Designed To Dwell: Tips for Installing Chair Rail ... from 4.bp.blogspot.com New how to remove chair rail |myles mayert was knowledgeable. It is not a dated look, this is just not executed well, especially considering the beautiful soffeted ceiling and the width of your crown moulding. The chair rail and trim was already white so i went with a matching white for the wall. The chair rail is weak. It often is painted to removing chair rail is a simple task requiring little skill and basic hand tools. This will further open a gap between the chair rail and the wall, making removal of the whole thing easier. Take a piece of sandpaper and use it to sand down the chair rail. Consider complete panelling below the chair rail:
Removing the chair rails from the walls demo is the fun part.
You might hear a slight cracking sound as the fabric breaks free from the metal side rail channels. This cuts the caulk and prevents the walls from getting torn up. If it is removed with. It is not a dated look, this is just not executed well, especially considering the beautiful soffeted ceiling and the width of your crown moulding. I've reached out to some local painters and they are saying that this is a orange peel textured wall when they look at pictures. 2 hold the pry bar perpendicular to the chair rail. Then, hit it with a rubber mallet until it's inserted correctly in the chair rail. Where the chair rail was, about every 6 inches, there are two nail holes and some of them are relatively large where the drywall chipped when i removed the rail. Consider complete panelling below the chair rail: It is not a dated look, this is just not executed well, especially considering the beautiful soffeted ceiling and the width of your crown moulding. How do you remove chair rail from plaster walls? You need to go deeper than the chip itself in order to fix the problem. Check the chair lock to ensure that it is released.
The room received several coats of paint over the years when the rail was in place. Use a utility knife to score along the edges of the trim. Then using a sturdy putty knife get in behind the chair rail, and then using a screwdriver or, anything else to pry it off, put the screwdriver on the putty knife using that as a block. Need info on how to remove chair from track assy. Removing the chair rails from the walls.
How to Install a Chair Rail Molding — The Family Handyman from cdn2.tmbi.com If you don't like that look, i would recommend removing the chair rail. When autocomplete results are available use up and down arrows to review and enter to select. Use a utility knife to score along the edges of the trim. Removing the chair rails from the walls demo is the fun part. You may need to work along the wall at first before you find a place where the knife will fit. Use the pry bar to pull the trim from the wall a bit. If you are dealing with real wood chair rails, you might also be able to sand out the chips. Slide the thin edge of the pry bar into the gap, using the putty knife as a shield to protect the wall.
Here's what i did to make things easier… first, i knew that i wanted below the chair rail to be white.
When autocomplete results are available use up and down arrows to review and enter to select. After cutting along the trim, insert the pry bar's edge into the wood trim. Get shopping advice from experts, friends and the community! If you are dealing with real wood chair rails, you might also be able to sand out the chips. Use a utility knife to score along the edges of the trim. This cuts the caulk and prevents the walls from getting torn up. Removing the chair rails from the walls. There is work involved and work involved to get things ready to paint once the chair rail is removed, but overall the actual removal is not that hard. Then, hit it with a rubber mallet until it's inserted correctly in the chair rail. Wainscoting or bead board would be a beautiful look. How to remove chair rail trimproducts used:trim pry bar: Carefully start on one side and slide the putty knife to the other end. A flat wall without a lot of trim is so much easier.
Touch device users, explore by touch or with swipe gestures. Cut through the caulk by running the edge of the pry bar along the seam where the chair rail meets the wall. A chair rail (or dado) was originally put in houses to protect the i wanted 3 full walls with shelves, but didn't want to remove the railing, and tall bookshelves need to. It is not a dated look, this is just not executed well, especially considering the beautiful soffeted ceiling and the width of your crown moulding. As we begin renovating the main bathroom of our 100 year old fixer upper house, we show how we removed the chair rail trim and paneling with a hammer and cro.
Chair Rail Molding Ideas: Simple Sophistication to Add ... from homesfeed.com Use a utility knife to score along the edges of the trim. Now, i'm not going to lie and tell you i can't see the chair rail at all or that this is a perfect solution. There is work involved and work involved to get things ready to paint once the chair rail is removed, but overall the actual removal is not that hard. Slide the thin edge of the pry bar into the gap, using the putty knife as a shield to protect the wall. This cuts the caulk and prevents the walls from getting torn up. Removing the chair rails from the walls demo is the fun part. The lock is located beneath the chair. Let it dry over night.
New how to remove chair rail are part of high house designs and architecture reference ideas.
Let it dry over night. Cut through the caulk by running the edge of the pry bar along the seam where the chair rail meets the wall. Carefully start on one side and slide the putty knife to the other end. Here's what i did to make things easier… first, i knew that i wanted below the chair rail to be white. Then, hit it with a rubber mallet until it's inserted correctly in the chair rail. How do you remove chair rail from plaster walls? The wainscoting and chair rail made it difficult to easily and quickly paint. No structural modifications are needed. Then, slowly pull the pry bar and the trim from the wall. Check the chair lock to ensure that it is released. It is not a dated look, this is just not executed well, especially considering the beautiful soffeted ceiling and the width of your crown moulding. How to remove chair rail trimproducts used:trim pry bar: It is not a dated look, this is just not executed well, especially considering the beautiful soffeted ceiling and the width of your crown moulding.